So in the last post we introduced quite a bit of new concepts.
We introduced ng-model to do a two way bind between a variable and an input field. We found out that ng-click is not just for calling functions but that it also allows expressions which we used to switch tabs. We discovered the same thing about ng-show that’s it’s not limited to a boolean variable, that you could use expressions like activeTab='inbox'.
We introduced ng-class which allowed us to assign classes to an element based on whether a condition was true. Finally we used filters to format dates.
Skip to next post?
In this post we’re not going to introduce any new functionality. Instead we’re going to apply what we’ve already learned to add reply and forward functionality. If you are not interested in doing that you can skip ahead to the next post where we learn how to communicate with the server.
Next Post: How to make an email web app using Angular (Part V)
Reply and forward
In this post we’re going to add reply and forward functionality. This will make it a fairly complete email application. We are going to implement it by reusing the compose email functionality. I’ll go through it quickly since it’s pretty straight forward and doesn’t introduce any new concepts.
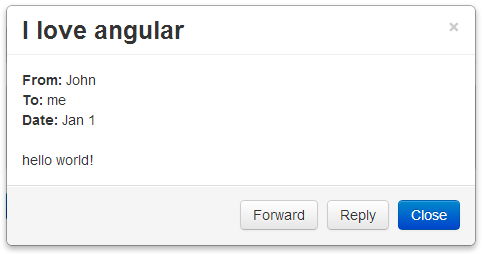
First we need to add the “Reply” and “Forward” buttons to the email details popup.
<a href="#" class="btn">Forward</a>
<a href="#" class="btn">Reply</a>
Should look like this: http://jsfiddle.net/luisperezphd/vFB5L/
Then we create the reply and forward functions on the controller:
$scope.forward = function() {
};

$scope.reply = function() {
};
Then we bind those functions to the buttons.
<a href="#" class="btn" ng-click="forward()">Forward</a>
<a href="#" class="btn" ng-click="reply()">Reply</a>
http://jsfiddle.net/luisperezphd/nbdgV/
Ok now we need to do the follow:
- Hide the view details popup
- Populate the
composeEmailobject - How it’s populated depends on whether it’s a reply or a forward
- Show the compose email popup
That’s it. Here is the commented reply() function:
$scope.reply = function() {
    // hide the view details popup
    $scope.isPopupVisible = false;
    // create an empty composeEmail object the compose email popup is bound to
    $scope.composeEmail = {};
    // copy the data from selectedEmail into composeEmail
    angular.copy($scope.selectedEmail, $scope.composeEmail);

    // edit the body to prefix it with a line and the original email information
    $scope.composeEmail.body =
        "\n-------------------------------\n"
        + "from: " + $scope.composeEmail.from + "\n"
        + "sent: " + $scope.composeEmail.date + "\n"
        + "to: " + $scope.composeEmail.to + "\n"
        + "subject: " + $scope.composeEmail.subject + "\n"
        + $scope.composeEmail.body;

    // prefix the subject with “RE:”
    $scope.composeEmail.subject = "RE: " + $scope.composeEmail.subject;
    // the email is going to the person who sent it to us
    // so populate the to with from
    $scope.composeEmail.to = $scope.composeEmail.from;
    // it’s coming from us
    $scope.composeEmail.from = "me";
    // show the compose email popup
    $scope.isComposePopupVisible = true;
};
When you click “Reply” the compose window should look like this:
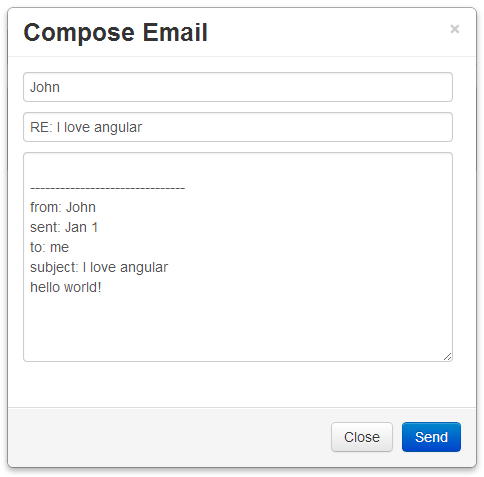
The forward() is practically identical to this, the only difference is that the subject is prefixed with “FW:“ instead of “RE:” and to is blank instead of the sender.
http://jsfiddle.net/luisperezphd/b8BJ2/
Touch Ups
If you run this now you will notice 2 things. One, in the “Sent” tab, the emails are listed from top down in the order they were sent. We want to display this in the reverse order so the last email you sent shows up at the top. To do that we can change the line of code that adds composeEmail to the sentEmails array. Instead of using push() to add the email to the end of the array we will use splice() to add it to the beginning. Like so:
//$scope.sentEmails.push($scope.composeEmail); // OLD
$scope.sentEmails.splice(0,0,$scope.composeEmail); // NEW
Also if you open up one of the sent emails with all the new added text you will see that it all runs into each other. We can fix this with a little CSS. We’ll use inline CSS just this once. We’ll wrap the body of the email around a <span> tag and set the CSS white-space property to pre. This tells the browser to honor line breaks. Like so:
<span style="white-space:pre">{{selectedEmail.body}}</span>
http://jsfiddle.net/luisperezphd/n5AZk/
In the next post we are going to round out our application by looking at how to communicate with the server:
I was about to give up learning angular today. but reading all these posts i am gona do it again.thanks for such an awesome posts. i am newbie in angular world but really excited to learn it and these post popup me.. thanks again
Thanks Anonymous that makes my day.
Thank you so much for posting this. It was so well done and extremely helpful to me.
This is definitely the best beginner level AngularJS tutorial out there. Keep up the good work!
This is indeed the BESSSTTT tutorial for angular beginners, thank you Luis Perez
This is bloody great. Well done, big fan