Last time on “AngularJS Game Programming”: We covered the game elements in minesweeper. In this post we’re going to start diving into writing the code.
Setup AngularJS
First we need setup AngularJS. This means including the AngularJS JavaScript file, creating a controller and wiring it up to the HTML. This is what that looks like:
<!DOCTYPE html>
<html ng-app>
  <head>
      <script src="http://ajax.googleapis.com/ajax/libs/angularjs/1.2.6/angular.min.js"></script>
      <script>
      function MinesweeperController($scope) {
          // code goes here
      });
      </script>
  </head>
    <body ng-controller="MinesweeperController">
    </body>
</html>
You can play around with the code here: http://jsfiddle.net/luisperezphd/vheyL/
I’m assuming you already have at least some exposure to Angular. If you want to dig deeper into controllers and directives in AngularJS first you can take a look at my step by step walkthrough blog post series at: How to make an email web app using Angular.
Code the Minefield
We’re going to program the game in the order I described it in the first post. Starting with the minefield. The minefield is a fixed grid of rows and columns. To model it we’re going to create an array of rows and populate each row with an array of spots.
The spots are going to be objects that keep track of the state of that particular spot on the grid. For example the spot object will keep track of whether that spot has been uncovered. Here is the code that will create the model of the 9 by 9 minefield:
function createMinefield() {
    var minefield = {};
    minefield.rows = [];

    for(var i = 0; i < 9; i++) {
        var row = {};
        row.spots = [];

        for(var j = 0; j < 9; j++) {
            var spot = {};
            spot.isRevealed = false;
            row.spots.push(spot);
        }

        minefield.rows.push(row);
    }

    return minefield;
}
Now we’ll assign the minefield to a variable in the $scope so we can access it from the HTML. So in our controller we’re going to add this line:
$scope.minefield = createMinefield();
Then in our HTML we’re going to bind our minefield data to an HTML table, repeating the table row for each row in our mine field, and repeating the <td> for each spot in our row. Like so:
<table border="1">
    <tr ng-repeat="row in minefield.rows">
        <td ng-repeat="spot in row.spots">
            {{spot.isCovered}}
        </td>
    </tr>
</table>
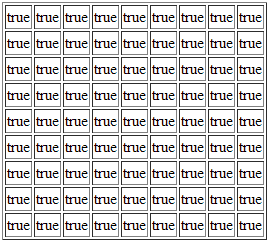
Our output should look like this:

It’s not the prettiest minefield I’ve ever seen but it’s a start.
Play with it at: http://jsfiddle.net/luisperezphd/QY4AL/
Next Time
In the next post we will add code that will allow us to uncover the posts. And we’ll add graphics to make it look more like a game.
Dear Luis Perez.
Thanks to you for this lessons.
I’v start writing my own game (Go) some weeks ago. Same table, 9×9. For now logic operation looks the same.
Please up me to date about new chapter of this course.
Best regards.